# TLS
Since version 1.19, V2Ray introduced transport layer security (TLS) support. If you have not heard that before, you may want to Google it first. Otherwise, these articles are also good introductions:
Brief Intro to SSL/TLS protocol mechanism (opens new window)
(Wikipedia) Transport Layer Security (opens new window)
# Register a domain
If you have already registered a domain name, you may skip this step. TLS requires a registered domain, either free or paid are available and usable, so feel free to use a free domain, while in general, a paid domain would be better than a free one. Let's just assume you know how to get a working domain. If not, just simply Google it. There are plenty of better and detailed tutorials out there.
Note that, you need to add an A record points to your server IP address, after you register domain.
The following configuration example will assume the registered domain is mydomian.me. Remember to replace it with your own ones.
# Generate Certificate
TLS is a certificate authentication mechanism, so a certificate is required to enable TLS, and certificates could also be free or paid. In this document, a free certificate is used. The certificate authority is Let's Encrypt (opens new window). There are many ways to generate a certificate. The simpler method is used here: Using acme.sh (opens new window) bash script to generate a certificate. Some of instructions in this section are referred from acme.sh README (opens new window).
There are two types of certificates, one is the ECC certificate (the built-in public key is the ECDSA public key), and the other one is the RSA certificate (the built-in RSA public key). In other words, ECCs of the same length are more secure than RSA, which means that with the same security, the ECC key length is much shorter than RSA (so encryption and decryption will be faster). However, the ECC certificate have worse compatibility compared with the RSA certificate, and it is not supported by Android 4.x and Windows XP. As long as your devices are not unearthed artifacts, you are highly recommended to use an ECC certificate.
Here are methods of generating both type of certificate. You can choose one of them based on your situation.
The certificate generation process is only needed to do on your server-side.
# Install acme.sh
By running the following commands, acme.sh will be installed into ~/.acme.sh.
$ curl  https://get.acme.sh | sh

% Total    % Received % Xferd  Average Speed   Time    Time     Time  Current
                               Dload  Upload   Total   Spent    Left  Speed
100   671  100   671    0     0    680      0 --:--:-- --:--:-- --:--:--   679
% Total    % Received % Xferd  Average Speed   Time    Time     Time  Current
                               Dload  Upload   Total   Spent    Left  Speed
100  112k  100  112k    0     0   690k      0 --:--:-- --:--:-- --:--:--  693k
[Fri 30 Dec 01:03:32 GMT 2016] Installing from online archive.
[Fri 30 Dec 01:03:32 GMT 2016] Downloading https://github.com/Neilpang/acme.sh/archive/master.tar.gz
[Fri 30 Dec 01:03:33 GMT 2016] Extracting master.tar.gz
[Fri 30 Dec 01:03:33 GMT 2016] Installing to /home/user/.acme.sh
[Fri 30 Dec 01:03:33 GMT 2016] Installed to /home/user/.acme.sh/acme.sh
[Fri 30 Dec 01:03:33 GMT 2016] Installing alias to '/home/user/.profile'
[Fri 30 Dec 01:03:33 GMT 2016] OK, Close and reopen your terminal to start using acme.sh
[Fri 30 Dec 01:03:33 GMT 2016] Installing cron job
no crontab for user
no crontab for user
[Fri 30 Dec 01:03:33 GMT 2016] Good, bash is found, so change the shebang to use bash as preferred.
[Fri 30 Dec 01:03:33 GMT 2016] OK
[Fri 30 Dec 01:03:33 GMT 2016] Install success!
After installation finished, run source ~/.bashrc to ensure the command is applied to your bash environment.
If errors prompted during installation, probably your system is missing components acme.sh needed, and it is highly possible to be netcat (nc). If so, you can use the following command to install it (Debian-like Distribution only):
$ sudo apt-get -y install netcat
# Generate certificate with acme.sh
# Generate Certificate
To generate certificate, simply run the following command:
The following command will listen on port 80, so make sure it is not occupied by other processes.
$ sudo ~/.acme.sh/acme.sh --issue -d mydomain.me --standalone -k ec-256

[Fri Dec 30 08:59:12 HKT 2016] Standalone mode.
[Fri Dec 30 08:59:12 HKT 2016] Single domain='mydomain.me'
[Fri Dec 30 08:59:12 HKT 2016] Getting domain auth token for each domain
[Fri Dec 30 08:59:12 HKT 2016] Getting webroot for domain='mydomain.me'
[Fri Dec 30 08:59:12 HKT 2016] _w='no'
[Fri Dec 30 08:59:12 HKT 2016] Getting new-authz for domain='mydomain.me'
[Fri Dec 30 08:59:14 HKT 2016] The new-authz request is ok.
[Fri Dec 30 08:59:14 HKT 2016] mydomain.me is already verified, skip.
[Fri Dec 30 08:59:14 HKT 2016] mydomain.me is already verified, skip http-01.
[Fri Dec 30 08:59:14 HKT 2016] mydomain.me is already verified, skip http-01.
[Fri Dec 30 08:59:14 HKT 2016] Verify finished, start to sign.
[Fri Dec 30 08:59:16 HKT 2016] Cert success.
-----BEGIN CERTIFICATE-----
MIIEMTCCAxmgAwIBAgISA1+gJF5zwUDjNX/6Xzz5fo3lMA0GCSqGSIb3DQEBCwUA
MEoxCzAJBgNVBAYTAlVTMRYwFAYDVQQKEw1MZXQncyBFbmNyeXB0MSMwIQYDVQQD
ExpMZXQncyBFbmNyeXB0IEF1dGhvcml0eSBYMzAeFw0xNjEyMjkyMzU5MDBaFw0x
NzAzMjkyMzU5MDBaMBcxFTATBgNVBAMTDHdlYWtzYW5kLmNvbTBZMBMGByqGSM49
****************************************************************
4p40tm0aMB837XQ9jeAXvXulhVH/7/wWZ8/vkUUvuHSCYHagENiq/3DYj4a85Iw9
+6u1r7atYHJ2VwqSamiyTGDQuhc5wdXIQxY/YQQqkAmn5tLsTZnnOavc4plANT40
zweiG8vcIvMVnnkM0TSz8G1yzv1nOkruN3ozQkLMu6YS7lk/ENBN7DBtYVSmJeU2
VAXE+zgRaP7JFOqK6DrOwhyE2LSgae83Wq/XgXxjfIo1Zmn2UmlE0sbdNKBasnf9
gPUI45eltrjcv8FCSTOUcT7PWCa3
-----END CERTIFICATE-----
[Fri Dec 30 08:59:16 HKT 2016] Your cert is in  /root/.acme.sh/mydomain.me_ecc/mydomain.me.cer
[Fri Dec 30 08:59:16 HKT 2016] Your cert key is in  /root/.acme.sh/mydomain.me_ecc/mydomain.me.key
[Fri Dec 30 08:59:16 HKT 2016] The intermediate CA cert is in  /root/.acme.sh/mydomain.me_ecc/ca.cer
[Fri Dec 30 08:59:16 HKT 2016] And the full chain certs is there:  /root/.acme.sh/mydomain.me_ecc/fullchain.cer
-k stands for private key length,whose value can be ec-256 , ec-384, 2048, 3072, 4096, and 8192. Those with ec- prefix means you are generating an ECC certificate, others are RSA certificate. Speaking of security, 256-bit length ECC certificate has an equal security level of 3072-bit RSA certificate.
# Renew Certificate
As the free Let's Encrypt certificate expires every 90 days, at least one renewal is required per 90 days. By default, acme.sh will set up an auto renewal which runs every 60 days. You can also renew certificates manually.
To manually renew an ECC certificate, run:
$ sudo ~/.acme.sh/acme.sh --renew -d mydomain.com --force --ecc
For RSA certificates, run:
$ sudo ~/.acme.sh/acme.sh --renew -d mydomain.com --force
** As we were generating certificates into /etc/v2ray folder, you also need to copy the renewed certificate into /etc/v2ray. **
# Install Certificate and Private Key
# ECC Certificate
Place certificate and private key into /etc/v2ray folder:
$ sudo ~/.acme.sh/acme.sh --installcert -d mydomain.me --fullchainpath /etc/v2ray/v2ray.crt --keypath /etc/v2ray/v2ray.key --ecc
# RSA Certificate
$ sudo ~/.acme.sh/acme.sh --installcert -d mydomain.me --fullchainpath /etc/v2ray/v2ray.crt --keypath /etc/v2ray/v2ray.key
** NOTE: DO NOT expose or leak your private key (v2ray.key file as above) in ANY circumstances to ANY person. If unfortunately you leaked it, you can use acme.sh to revoke it, and generate a new certificate. Detailed instructions are documented in acme.sh's own tutorials. **
# Configure V2Ray
# Server-side configuration
{
  "inbounds": [
    {
      "port": 443, // recommended port
      "protocol": "vmess",
      "settings": {
        "clients": [
          {
            "id": "23ad6b10-8d1a-40f7-8ad0-e3e35cd38297",
            "alterId": 64
          }
        ]
      },
      "streamSettings": {
        "network": "tcp",
        "security": "tls", // set security to tls to enable tls feature
        "tlsSettings": {
          "certificates": [
            {
              "certificateFile": "/etc/v2ray/v2ray.crt", // certificate file
              "keyFile": "/etc/v2ray/v2ray.key" // corresponding private key file
            }
          ]
        }
      }
    }
  ],
  "outbounds": [
    {
      "protocol": "freedom",
      "settings": {}
    }
  ]
}
# Client-side configuraion
{
  "inbounds": [
    {
      "port": 1080,
      "protocol": "socks",
      "sniffing": {
        "enabled": true,
        "destOverride": ["http", "tls"]
      },
      "settings": {
        "auth": "noauth"
      }
    }
  ],
  "outbounds": [
    {
      "protocol": "vmess",
      "settings": {
        "vnext": [
          {
            "address": "mydomain.me", // tls needs domain, so fill in your own.
            "port": 443,
            "users": [
              {
                "id": "23ad6b10-8d1a-40f7-8ad0-e3e35cd38297",
                "alterId": 64
              }
            ]
          }
        ]
      },
      "streamSettings": {
        "network": "tcp",
        "security": "tls" // set security to tls to enable tls feature.
      }
    }
  ]
}
# Verify
Usually, after doing the above steps, V2Ray client already can connect to the internet, which means the TLS configuration is working. However, with a reliable way to verify if it is enabled will make it more convinced.
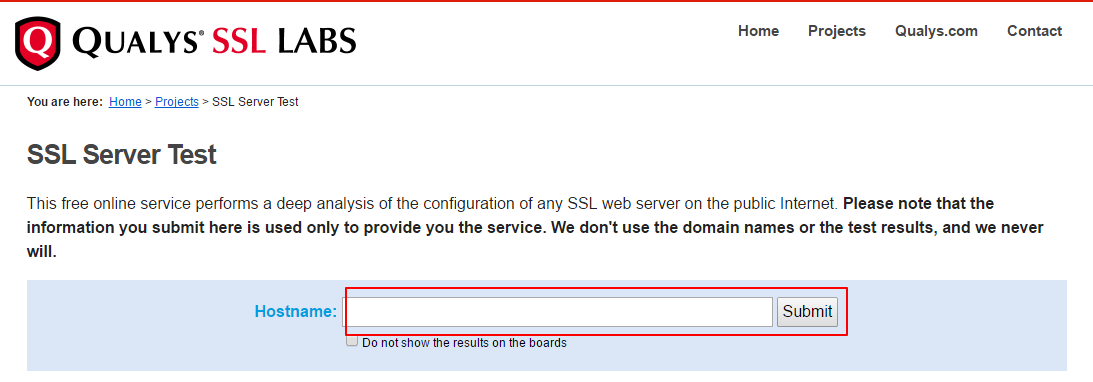
There are many ways to validate the TLS, but an easy one is from Qualys SSL Labs's SSL Server Test (opens new window).
** NOTE: Qualys SSL Labs's SSL Server Test runs check on port 443, so you have to configure your server's inbound port to 443. **
Click Qualys SSL Labs's SSL Server Test (opens new window), then input your domain into Hostname; then click submit, after a while, you will able to see the result.
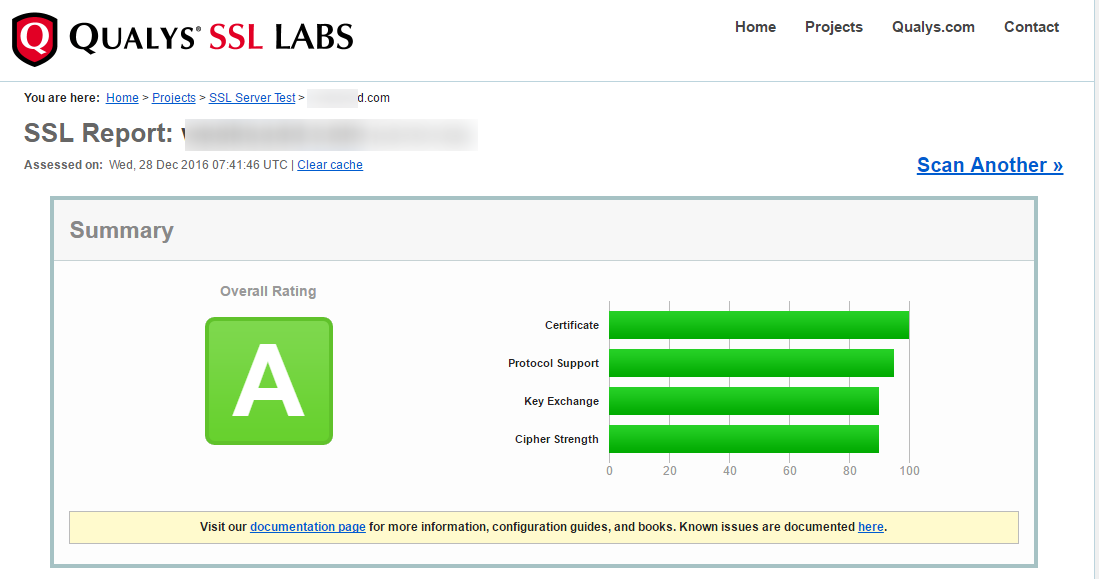 This is an overall scoring to your TLS/SSL configuration, Here I got A, which is nice enough and proves our TLS is working fine.
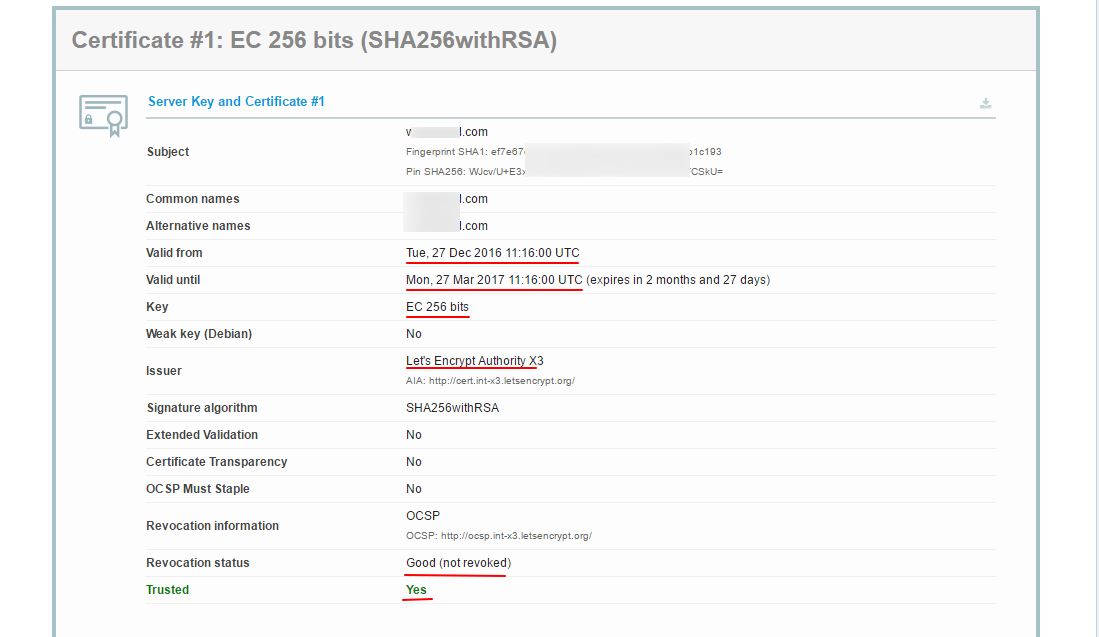 Here it is your certificate information. In this screenshot, we can see it is valid through Dec 27, 2016, to Mar 27, 2017, and the encryption method used is 256-bit ECC certificate, which is signed by Let's Encrypt. Most importantly,
 Trusted status is Yes, which means the certificate can be trusted.
# Tip
** V2Ray is using a REAL TLS implementation rather than cloaking or obfuscation, that's why it needs domain and certificate. Also, the Websocket is REAL as well, which we'll talk about later. **
# Updates
- 2017-08-06 Added some tips.
- 2017-12-31 Typo fixed.
- 2018-04-05 Update
- 2018-11-17 Adapted for V4.0+