# Installation
This section explains how to install V2Ray, which includes server installation and client installation. It should be noted that unlike Shadowsocks, V2Ray does not distinguish between server and client versions from the software, which means that V2Ray running on the server and client is the same software, the difference is only the configuration file. Therefore, the installation of V2Ray is the same on the server and the client, but usually, the VPS uses Linux and the PC uses Windows. Therefore, the default server in this chapter is Linux VPS and the client is Windows PC. If your PC is using a Linux operating system, please refer to the server installation in this article; VPS uses Windows, refer to the client installation of this article; if you are using macOS, please study how to install it yourself, after the installation is finished Continue to look down through this section.
# Before You Install
# Time correction
V2Ray's verification mechanism includes time. Even if your configuration has no problems, having an incorrect time will stop you from connecting to the server, and it will think that you are making an illegal request. Due to this, your system time needs to be correct to within 90 seconds.
For VPS (Linux) you can execute the command date -R to view the time:
$ date -R
Sun, 22 Jan 2017 10:10:36 -0500
-0500 in the output indicates that the time zone is West 5, and if converted to East 8 time, it is 2017-01-22 23:10:36.
If the time is not accurate, you can use date --set to modify the time:
$ sudo date --set="2017-01-22 16:16:23"
Sun 22 Jan 16:16:23 GMT 2017
If your server architecture is OpenVZ, then the above command may not be able to modify the time. Directly send a work order to contact the VPS provider's customer service. It means that the service you are running on the VPS has time requirements and they are required to provide feasible. The method of modifying the system time.
The time calibration of the VPS is followed by a personal computer.
Whether it's a VPS or a personal computer, the time zone doesn't matter, because V2Ray automatically converts the time zone, but the time must be accurate.
# Using Root User
To make the install easier, we recommend that you switch over to the root user.
Command to run:sudo su
Afterwards you need to input your administrator password. (Don't worry if you can't see the text you enter. That's a security feature.)
Example command line output:
user@host:~$ su
Password:
root@host:/home/user#
# Install on servers
In the Linux operating system, V2Ray is installed in three ways: script installation, manual installation, and compilation. You can choose one of them. This guide only provides the method of using script to install, and only the script installation is recommended. The script is V2Ray. Officially available. This script can only be used on the Debian series or the Linux operating system that supports Systemd.
**Unless you are familiar with Linux or you are able to handle "command not found" by yourself, please please use a Linux system with Debian 8.x or higher or Ubuntu 16.04 or higher. ** This guide uses Debian 10 for reference.
# Installation Dependencies
The installation requirements are dependent on the Linux distro you use. Below are some examples.
**Note: The commands you need to enter below all start with $, and other content comes from the feedback of the system execution command. You can judge whether the installation is correct by comparing the similarities and differences between the content on your screen and the content in the document. **
Debian/Ubuntu:
$ apt update
$ apt install curl
CentOS/RedHat :
$ yum makecache
$ yum install curl
Fedora:
$ dnf makecache
$ dnf install curl
openSUSE/SUSE:
$ zypper refresh
$ zypper install curl
# Download the installation script
Download the main program installation script:
$ curl -O https://raw.githubusercontent.com/v2fly/fhs-install-v2ray/master/install-release.sh
  % Total    % Received % Xferd  Average Speed   Time    Time     Time  Current
                                 Dload  Upload   Total   Spent    Left  Speed
  0     0    0     0    0     0      0      0 --:--:-- --:--:-- --:--:--     0
  0     0    0     0    0     0      0      0 --:--:--  0:00:01 --:--:--     0
100 21613  100 21613    0     0   8732      0  0:00:02  0:00:02 --:--:--  8736
# Execute Installation
Install v2ray-core:
$ bash install-release.sh
Downloading V2Ray archive: https://github.com/v2fly/v2ray-core/releases/download/v4.27.0/v2ray-linux-64.zip
  % Total    % Received % Xferd  Average Speed   Time    Time     Time  Current
                                 Dload  Upload   Total   Spent    Left  Speed
  0     0    0     0    0     0      0      0 --:--:-- --:--:-- --:--:--     0
  0     0    0     0    0     0      0      0 --:--:-- --:--:-- --:--:--     0
100   631  100   631    0     0    331      0  0:00:01  0:00:01 --:--:--   331
  0     0    0     0    0     0      0      0 --:--:--  0:00:02 --:--:--     0
100 12.2M  100 12.2M    0     0   841k      0  0:00:14  0:00:14 --:--:-- 1899k
Downloading verification file for V2Ray archive: https://github.com/v2fly/v2ray-core/releases/download/v4.27.0/v2ray-linux-64.zip.dgst
  % Total    % Received % Xferd  Average Speed   Time    Time     Time  Current
                                 Dload  Upload   Total   Spent    Left  Speed
  0     0    0     0    0     0      0      0 --:--:-- --:--:-- --:--:--     0
  0     0    0     0    0     0      0      0 --:--:-- --:--:-- --:--:--     0
100   636  100   636    0     0    294      0  0:00:02  0:00:02 --:--:--   295
  0     0    0     0    0     0      0      0 --:--:--  0:00:02 --:--:--     0
100   590  100   590    0     0    133      0  0:00:04  0:00:04 --:--:--   282
Reading package lists... Done
Building dependency tree
Reading state information... Done
Suggested packages:
  zip
The following NEW packages will be installed:
  unzip
0 upgraded, 1 newly installed, 0 to remove and 0 not upgraded.
Need to get 172 kB of archives.
After this operation, 580 kB of additional disk space will be used.
Get:1 http://mirrors.163.com/debian buster/main amd64 unzip amd64 6.0-23+deb10u1 [172 kB]
Fetched 172 kB in 1s (173 kB/s)
Selecting previously unselected package unzip.
(Reading database ... 31383 files and directories currently installed.)
Preparing to unpack .../unzip_6.0-23+deb10u1_amd64.deb ...
Unpacking unzip (6.0-23+deb10u1) ...
Setting up unzip (6.0-23+deb10u1) ...
Processing triggers for mime-support (3.62) ...
Processing triggers for man-db (2.8.5-2) ...
info: unzip is installed.
info: Extract the V2Ray package to /tmp/tmp.vk9AF2EqKA/ and prepare it for installation.
installed: /usr/local/bin/v2ray
installed: /usr/local/bin/v2ctl
installed: /usr/local/share/v2ray/geoip.dat
installed: /usr/local/share/v2ray/geosite.dat
installed: /usr/local/etc/v2ray/00_log.json
installed: /usr/local/etc/v2ray/01_api.json
installed: /usr/local/etc/v2ray/02_dns.json
installed: /usr/local/etc/v2ray/03_routing.json
installed: /usr/local/etc/v2ray/04_policy.json
installed: /usr/local/etc/v2ray/05_inbounds.json
installed: /usr/local/etc/v2ray/06_outbounds.json
installed: /usr/local/etc/v2ray/07_transport.json
installed: /usr/local/etc/v2ray/08_stats.json
installed: /usr/local/etc/v2ray/09_reverse.json
installed: /var/log/v2ray/
installed: /var/log/v2ray/access.log
installed: /var/log/v2ray/error.log
installed: /etc/systemd/system/v2ray.service
installed: /etc/systemd/system/[email protected]
removed: /tmp/tmp.vk9AF2EqKA/
info: V2Ray v4.27.0 is installed.
You may need to execute a command to remove dependent software: apt remove curl unzip
Please execute the command: systemctl enable v2ray; systemctl start v2ray
If you see a prompt similar to this, the installation is successful. If the installation is unsuccessful, the script will prompt you. At this time, you should troubleshoot according to the prompts. After debugging, re-execute the script to install V2Ray. If you don't understand the error message, just use translation software to translate it.
# Run V2Ray
After installation, start V2Ray with the following command:
$ systemctl start v2ray
After the first installation is completed, V2Ray will not start automatically and you need to manually run the above startup command.
Set V2Ray to start automatically at boot:
$ systemctl enable v2ray
Next, let’s see if V2ray is really running:
$ systemctl status v2ray
● v2ray.service - V2Ray Service
   Loaded: loaded (/etc/systemd/system/v2ray.service; disabled; vendor preset: enabled)
   Active: active (running) since Sun 2020-08-16 23:17:13 CST; 41min ago
 Main PID: 1984 (v2ray)
    Tasks: 6 (limit: 2359)
   Memory: 6.9M
   CGroup: /system.slice/v2ray.service
           └─1984 /usr/local/bin/v2ray -confdir /usr/local/etc/v2ray/

Aug 16 23:17:13 debian v2ray[1984]: v2ctl> Read config:  /usr/local/etc/v2ray/01_api.json
Aug 16 23:17:13 debian v2ray[1984]: v2ctl> Read config:  /usr/local/etc/v2ray/02_dns.json
Aug 16 23:17:13 debian v2ray[1984]: v2ctl> Read config:  /usr/local/etc/v2ray/03_routing.json
Aug 16 23:17:13 debian v2ray[1984]: v2ctl> Read config:  /usr/local/etc/v2ray/04_policy.json
Aug 16 23:17:13 debian v2ray[1984]: v2ctl> Read config:  /usr/local/etc/v2ray/05_inbounds.json
Aug 16 23:17:13 debian v2ray[1984]: v2ctl> Read config:  /usr/local/etc/v2ray/06_outbounds.json
Aug 16 23:17:13 debian v2ray[1984]: v2ctl> Read config:  /usr/local/etc/v2ray/07_transport.json
Aug 16 23:17:13 debian v2ray[1984]: v2ctl> Read config:  /usr/local/etc/v2ray/08_stats.json
Aug 16 23:17:13 debian v2ray[1984]: v2ctl> Read config:  /usr/local/etc/v2ray/09_reverse.json
Aug 16 23:17:13 debian v2ray[1984]: 2020/08/16 23:17:13 [Warning] v2ray.com/core: V2Ray 4.27.0 start
lines 1-19/19 (END)
If you see a prompt similar to this, the startup is successful.
But since you haven’t configured V2ray yet, let’s turn it off:
$ systemctl stop v2ray
There are more usages for the installation script, which I won’t go into here. You can execute bash install-release.sh -h to see the help.
For V2ray configuration, please refer to the examples in v2ray-examples (opens new window).
# Update V2Ray
On VPS, you can update it by re-executing the installation script. V2Ray will be restarted automatically during the update process, and the configuration file will remain unchanged.
$ bash install-release.sh
V2Ray’s update strategy is to iterate quickly and update every week (unless there are any surprises). The format of the version number is vX.Y.Z, such as v2.44.0. v is the fixed letter v, the first letter of version; X, Y, Z are all numbers, X is the major version number, and a major version is updated every year (it is now v4). Y is a minor version, and a minor version is updated every Friday. Z distinguishes between the official version and the test version. If Z is 0, it means it is the official version. If it is not 0, it means it is the test version. For example, v4.7.0 is the official version and v4.7.1 is the test version. It is recommended to use only the official version. The V2Ray installation script will only install the latest official version without manually specifying it.
Some attentive friends may notice that V2Ray has just released a new version on Friday and updated the official version the next day or two days. This happened because the official version released on Friday had a serious bug affecting the use of a new version. This situation is annoying, but in order to ensure compatibility, performance optimization, etc., you need to ensure that the version is not too old. Therefore, I recommend updating on Thursday. I chose this day because there are major bugs that have been fixed in the first few days. If the small problem (I don't know), it will not affect the use; and the version number and the latest version. It doesn't matter if you are one or two later.
# Install on client
Click here (opens new window) to download the Windows compressed package of V2Ray. If it is a 32-bit system, download v2ray-windows-32.zip. If it is a 64-bit system, download v2ray-windows-64.zip (If the download speed is slow or cannot be downloaded, please consider using existing circumvention software to download). After downloading and unzipping, you will have the following files:
v2ray.exeRun V2Ray program filewv2ray.exeis the same as v2ray.exe, the difference is that wv2ray.exe runs in the background, unlike v2ray.exe which has a window similar to the cmd console. When running V2Ray, choose either v2ray.exe or wv2ray.execonfig.jsonV2Ray configuration file, we will configure V2Ray later to modify this file.v2ctl.exeV2Ray tool, has a variety of functions, except for special purposes, usually called by v2ray.exe, users do not care too muchgeosite.datdomain name file for routinggeoip.datIP file for routingOthersOther than the files mentioned above, the others are not necessary files for running V2Ray. For a more detailed explanation, you can see the readme.md file in the doc folder, which can be opened by Notepad or other text editors.
In fact, double-click v2ray.exe (or wv2ray.exe) to run V2Ray. V2Ray will read the configuration in config.json and connect to the server. The default configuration file contains the configuration of the V2Ray official server, which means that you can directly use the server provided by V2Ray to surf the Internet scientifically without building a server yourself. Without modifying config.json, double-click to run v2ray.exe, and you can directly surf the Internet (V2Ray official server has been offline).

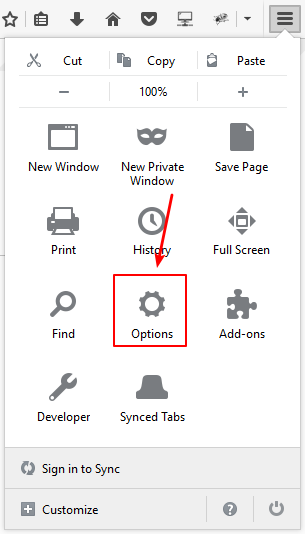
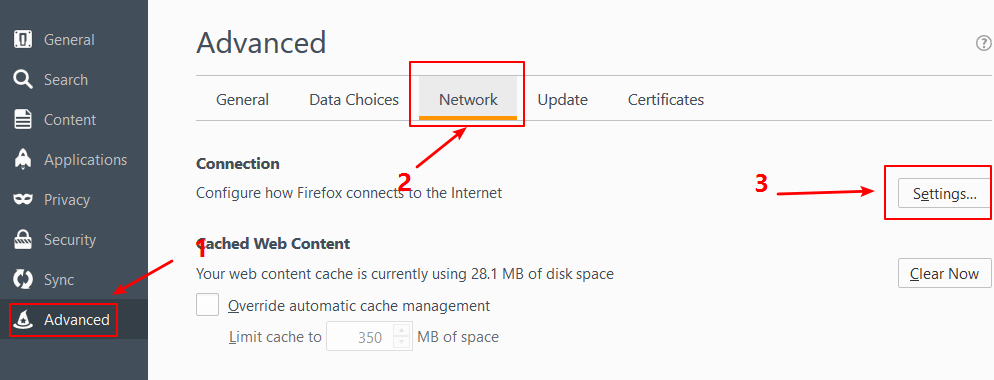
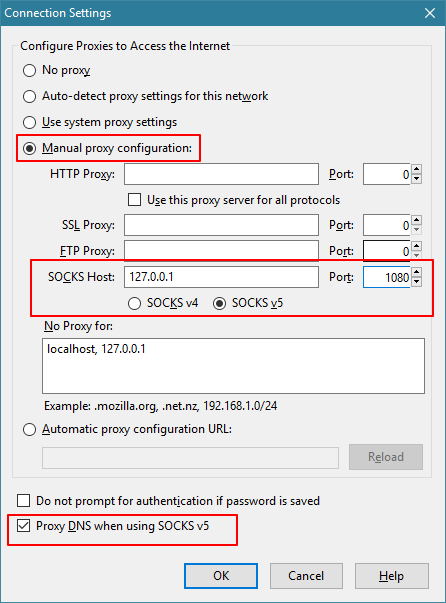
V2Ray gives all the options to the user, it does not automatically set the system proxy, so you also need to set the proxy in the browser. For example, Firefox (Firefox), click Menu -> Options -> Advanced -> Settings -> Manual Proxy Settings, fill in 127.0.0.1 in SOCKS Host, fill in 1080 in the following port, and then proxy DNS when using SOCKS v5 ( This tick option is called remote DNS in the old version. The operation diagram is as follows:
It should be noted that the SOCKS port of some clients is not 1080, and the actual port needs to check the client's related default settings.
See below diagram for how to configure:

If you are using another browser, please find out how to set up the SOCKS proxy on the Internet.